5. OpenGL 4 Vertex Buffer Objects (VBOs) for Colour
Introduction
If you remember back to the last tutorial, I mentioned that in our core-profile renderer we no longer have the old immediate-mode calls for creating primitives such as glBegin(GL_TRIANGLES). Well this also holds for the old glColor path. So how do we change the colour of our shapes and vertices? Well just like we created a Vertex Buffer Object (VBO) to store our positions, we can do exactly the same thing with our colours and have the same Vertex Array Object (VAO) remember both vertex-attribute setups.
Is this difficult? Definitely not, most of it is exactly the same thing we did for the vertices. There is one important correction to the old explanation though: our second VBO is not automatically interpreted as colour just because it is the second VBO. We explicitly connect it to attribute location 1 with glVertexAttribPointer(1, ...), and back in the shader tutorial we bound in_Color to location 1. That agreement is what makes it colour data.
An important thing to note is that a VAO can describe all of the per-vertex attributes needed for a draw: position, colour, normals, texture coordinates and whatever else your shader expects. I am using a separate VBO for position and colour because it makes the tutorial easy to follow, but that is not a requirement. You can also interleave multiple attributes inside one VBO and describe the stride/offsets with glVertexAttribPointer.
Coding
To start off, I am going to open up opengl_3.h and you might remember we created an array to hold our VBO’s. Well this array had a length of 1, so we are going to give that a bump up to 2 like so:
unsigned int vboID[2]; // Our Vertex Buffer Object
Now switch over to opengl_3.cpp and we are going to start setting up our colour VBO. Go ahead, and just under where we created the variable for the vertices array, do a copy and paste, but call this variable colours. You will get something like this:
float *vertices = new float[18]; // Vertices for our square
float *colors = new float[18]; // Colours for our vertices
As a vertex takes up 3 values for x, y and z. We are going to use 3 values for our colour, being r, g and b. You can also jump this up to r, g, b and a, you just need to add an extra float value for each vertex you have and also change the VBO to use 4 variables per vertex instead of 3.
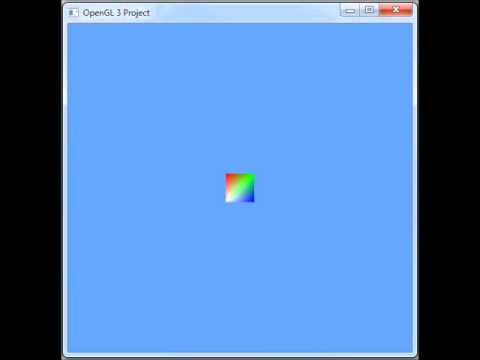
But for simplicity we are going to stick with no alpha value, and hence no alpha blending. So just as we created our vertices, do the exact same thing, but using the colour variable. I am using the colours white for bottom left, red for top left, green for top right and blue for bottom right.
vertices[0] = -0.5; vertices[1] = -0.5; vertices[2] = 0.0; // Bottom left corner
colors[0] = 1.0; colors[1] = 1.0; colors[2] = 1.0; // Bottom left corner

vertices[3] = -0.5; vertices[4] = 0.5; vertices[5] = 0.0; // Top left corner
colors[3] = 1.0; colors[4] = 0.0; colors[5] = 0.0; // Top left corner

vertices[6] = 0.5; vertices[7] = 0.5; vertices[8] = 0.0; // Top Right corner
colors[6] = 0.0; colors[7] = 1.0; colors[8] = 0.0; // Top Right corner

vertices[9] = 0.5; vertices[10] = -0.5; vertices[11] = 0.0; // Bottom right corner
colors[9] = 0.0; colors[10] = 0.0; colors[11] = 1.0; // Bottom right corner

vertices[12] = -0.5; vertices[13] = -0.5; vertices[14] = 0.0; // Bottom left corner
colors[12] = 1.0; colors[13] = 1.0; colors[14] = 1.0; // Bottom left corner

vertices[15] = 0.5; vertices[16] = 0.5; vertices[17] = 0.0; // Top Right corner
colors[15] = 0.0; colors[16] = 1.0; colors[17] = 0.0; // Top Right corner
That should all be looking pretty straight forward. Now we need to go jump down a couple of lines to where we call glGenBuffers(1, &vboID[0]); Bump this also up to 2, so that we are generating 2 vertex buffer objects.
glGenBuffers(2, &vboID[0]); // Generate our two Vertex Buffer Object
And then virtually do a copy and paste of the lines from glBindBuffer to glEnableVertexAttribArray. Then inside of this big paste block, we want to change our glBindBuffer go the second vboID, so vboID[1] and change the variable vertices from the line glBufferData to the variable colours. Finally we need to change the value from glEnableVertexAttribArray from 0 to 1. So we get this:
glBindBuffer(GL_ARRAY_BUFFER, vboID[1]); // Bind our second Vertex Buffer Object

glBufferData(GL_ARRAY_BUFFER, 18 * sizeof(GLfloat), colors, GL_STATIC_DRAW); // Set the size and data of our VBO and set it to STATIC_DRAW

glVertexAttribPointer((GLuint)1, 3, GL_FLOAT, GL_FALSE, 0, 0); // Set up our vertex attributes pointer

glEnableVertexAttribArray(1); // Enable the second vertex attribute array
And last but not least, make a call to delete the colours array before we finish our method:
delete [] colors; // Delete our colours from CPU memory
All you have to do now is give this modified code a compile and run it. You should now see the square blend between the colours at each vertex. The rasteriser interpolates our in_Color values across the triangles before the fragment shader writes the final colour. Not bad for what was basically “do the VBO bit again, but with RGB values”.
Questions or corrections? If something doesn’t work or you spot something I’ve got wrong, leave a comment below. These tutorials have been around a long time, so useful corrections are always welcome!
The two shader files need to be moved into the “OpenGL 3 Project” folder if you are running a modern version of Visual Studio (2015), otherwise you get a large black square.
Thanks for the great tutorials!
The code runs fine on my pc with Nvidia card, but the square is messed up on my laptop with Ati card. With a few hours of searching, I found out that the Ati compiler ignores the ‘glBindAttribLocation’ command, and you have to set the layout in the shader file for it in order to work. So the vertex shader changes a little bit:
#version 150 core
layout(location = 0) in vec3 in_Position;
layout(location = 1) in vec3 in_Color;
…
the color problem was a shader problem. The shaders weren’t compiling because of the path…..
The program was using the fixed pipeline to draw since the shaders did not compile…. creating a large black square.
I used Cygwin64 to execute the program in a place where I could see Debug info that was written into the program.
I am trying to get the thing to draw as a quad with little success….
It should be simple….Or I am……..Here is the change to the code change….. Only one….
change
glDrawArrays(GL_TRIANGLES, 0, 6); // Draw our square
to
glDrawArrays(GL_QUADS, 0, 4); // Draw our square
Right? any input would be appreciated!
great tutorial… I am having trouble with the colors… here is the code I added.
float* colors = new float[18];
colors[0] = 1.0; colors[1] = 1.0; colors[2] = 0.0;
colors[3] = 0.0; colors[4] = 1.0; colors[5] = 1.0;
colors[6] = 0.0; colors[7] = 1.0; colors[8] = 0.0;
colors[9] = 1.0; colors[10] = 1.0; colors[11] = 0.0;
colors[12] = 0.0; colors[13] = 1.0; colors[14] = 1.0;
colors[15] = 0.0; colors[16] = 1.0; colors[17] = 0.0;
// changed this to add 2 buffers, also expanded the array size in the header file for vboID to 2
glGenBuffers(2, vboID); // Generate our Vertex and color Buffer Object
glBindBuffer(GL_ARRAY_BUFFER, vboID[1]); // Bind our Vertex Buffer Object
glBufferData(GL_ARRAY_BUFFER, 18 * sizeof(GLfloat), colors, GL_STATIC_DRAW);
glVertexAttribPointer((GLuint)1, 3, GL_FLOAT, GL_FALSE, 0, 0); // Set up our vertex attributes pointer
glEnableVertexAttribArray(1); // Enable our Vertex Array Object
Any idea of what is missing???
I have completed all the open gl 4 tutorials up to this one, but I do not believe this one and the previous one are working. The square is always black. When the shader initiallized, I put a stop in the “if (vsText == NULL || fsText == NULL) ” block and it did not stop the program, so it seems that it is finding my shader code. I tried manually changing the shader code directly, but no changes to the code seem to change it. by shader, I mean vertex and fragment shader code. I added shader.vert and shader.frag to the project as new items, but with the vert and frag extensions.
If i had to guess, I would say it is not compilling my shaders, but I do not know why.
First, I would Like to say thank you for your tutorial.
I have some remaks about it, first of all, the aspect ratio of the application can change, so, it will be better to compute the projection matrix every time the window is resized.
Secondly, we don’t need to call glViewport in every frame, we can do it only when we resize the window.
My last remark is that with some graphic cards (such as the AMD radeon HD 6970) don’t wait for the vsync to swap the front and back buffers, that will cause an overload of a core because it will compute as many frames as it can and not a necessary amount of frame. To avoid that problem there is the wglSwapIntervalEXT function on Windows, glXSwapIntervalEXT and glXSwapIntervalSGI on Linux.
Excellent tutorials. I found two issues. One is the shaders should be in the same directory as the source (at least with the downloads for Visual Studio 2010.) Otherwise, when you run from within Visual Studio it doesn’t work.
The second issue is the comments on the glEnableVertexAttribArray(0) and glBindVertexArray(0) calls from within opengl_3::create_square are wrong. glEnableVertexAttribArray(0) says it is to disable the Vertex Array Object. glBindVertexArray(0) says it is to disable the vertex buffer object.
In addition, there is an undocumented and hard coded relationship between opengl_3 and shader. They both have to know that vertex attribute array index 0 is for vertices and vertex attribute array index 1 is for color. These should be defined constants.
Wowie! Finally I was able to do this stuff! That first tutorial gave me a lot of trouble earlier, which I still do not know why, but after coming back to these tutorials I got everything to work! This is really great because I DO NOT KNOW C++ :).
Anyways, Swiftless, you did a great job, and I really hope you continue to post new tutorials extending what is already here.
Thanks to you, I now I have the foundation I need to get started with using one of my OpenGL 4.0 Shading Language books :D!
God Bless,
Nick.
most of the lines are cut off here!
I’ve tried to follow this tutorial.
https://github.com/sharavsambuu/rrc-tank/blob/master/game/Demo00.cpp
thank you very much for great tutorials!!!
I copied exactly the code by hand, and then I downloaded the source code .. the result is that my window displays only a white square. If I resize the window extending it, the extended part shows a black background. If I try to decrease it until the square, it is overwritten by the black background, and never comes back as before.
I do not know how to do: | I copied the files .vert and .frag in all possible directories and get the exact same result … the compiler does not show any error … I do not know what to do. Help!
It might be possible that your white square is caused by incorrect shader files, did you copy exactly what it said in tutorial 2? Overlooking this caused a white square for me, at least.
Is there anyway to do this without glew or glm?
if you did this without glew you’d have to spend a ton of time writting out function pointers to the opengl functions you need to do this. if you did this without glm you’d have to learn vector as well as matrix related math which usually involves learning basic physics. essentially use glm and glew or you’ll be wasting a lot of your valuable time.
Yes there is.
Write your own opengl extenstion library and write your own matrix library 🙂
yeah, I understand the extension library more now. I basically just use GL3W without any extensions. I was looking at the opengl website and they said that a dummy context had to be created in order to get the wgl functions like wglGetProcAddress but i dont see why you cant just use GetProcAddress to do this…
How could i draw two objects, which I’ve put in other two vbo’s?
bind your second vao, or the vbos individually, update your model matrix data with glUniformMatrix4fv and then call the drawing command again
Hello. This tutorial is really good, but when I wrote this code my box disappeared.
I don’t know what happened?
glGenVertexArrays(1, &vaoID[0]); // Create our Vertex Array Object
glBindVertexArray(vaoID[0]); // Bind our Vertex Array Object so we can use it
glGenBuffers(2, &vboID[0]); // Generate our Vertex Buffer Object
glBindBuffer(GL_ARRAY_BUFFER, vboID[0]); // Bind our Vertex Buffer Object
glBufferData(GL_ARRAY_BUFFER, 18 * sizeof(GLfloat), vertices, GL_STATIC_DRAW); // Set the size and data of our VBO and set it to STATIC_DRAW
glVertexAttribPointer((GLuint)0, 3, GL_FLOAT, GL_FALSE, 0, 0); // Set up our vertex attributes pointer
glBindBuffer(GL_ARRAY_BUFFER, vboID[1]); // Bind our second Vertex Buffer Object
glBufferData(GL_ARRAY_BUFFER, 18 * sizeof(GLfloat), colors, GL_STATIC_DRAW); // Set the size and data of our VBO and set it to STATIC_DRAW
glVertexAttribPointer((GLuint)1, 3, GL_FLOAT, GL_FALSE, 0, 0); // Set up our vertex attributes pointer
glEnableVertexAttribArray(1); // Enable the second vertex attribute array
glBindVertexArray(0);
Sorry for my English.
Sorry, I forget glEnableVertexAttribArray(0);
Now it works.
Nothing to say but thankyou for your detailed tutorials, they are the best i´ve found
Hi Swiftless!
Great Tutorial!
I was wondering if you could help me on a few questions:
This first one deals with how to load the VBO with Data.
In the other Terrain VBO tutorial, you loaded the VBO using an array of vertices structures, while in this tutorial, you used an array of floats.
So the OpenGL VBO knows to parse this array of vertices structures and store the coordinates xyz? Did it depend on how you named the variables? Or did it just assume that the first element is x and the following are y then z? ( I think its the way the pointer reads whats stored it isnt it?)
And the second question:
Seeing as how you implemented loading VBOs with differing data types, I was wondering how else you could add data to the buffer. Could you just pass a struct to the VBO and it would work?
Keep coming out with great tutorials!
Thanks for the help! and if anyone else can help me, feel free to answer too.
Hmm, can’t get this tutorial to display any color, my square remains white (same as it was in the previous tutorial). Have tried it twice now 🙁
@Ben
It sounds like it isn’t loading your shader. The default download doesn’t seem to make VS2010 happy with the shader path. Move the .vert and .frag files into the folder with the project name. (Not Debug or ipch). In my case it was OpenGL 3 Project.
I am fairly sure that the above is correct, if not, put it in the folder with the generated executable ( the Debug or Release folder)
Looks really nice ’till now, great job!
Do you have any idea when the next tutorial comes out and what it will be about?
I really want to know how to have multiple objects on the screen and manipulate them separately.
Thanx!
Thanks for your tutorials.
Will you have more tutorials on GLSL 3.3 and lighting?
A specific question I have is:
Since gl_Normal is now deprecated, how are normals that were specified automatically now queried? For example, how are normals for all the glut primitives (glutSolidTeapot, etc) now queried in glsl? Or we can no longer use those functions with the new specs?
Hey just asking, are there more tutorials in the works?
Thanks
Thanks for posting this. Can’t wait for the next one, geometry shaders are proveing to be an issue for me.
As far as I can tell I’ve copied your code exactly but my square appears deformed (the colour looks fine).
If I comment the new call the glBufferData() then the square looks normal again and has some colour.
Unless it’s to do with the fact that I’m using Windows/VS then I can only think I’ve put certain lines in the wrong place so it would be nice if you could upload the code as with the other articles.
Great site, by the way, please keep these tutorials coming as they’re the best I’ve found anywhere.
Awesome! 😀
Can you post the code?
Finally!